Excel is the most popular and powerful program for data visualization, analysis and documentation. There are 17,179,869,184 cells in each Excel spreadsheet. To put that into perspective, even if Shakespeare filled one cell in 1 second from his birth, he wouldn’t still have completed one spreadsheet by today. Therefore, we have to ensure that documents are accessible to everyone with or without disabilities.
Fortunately, Excel has a built-in accessibility checker that will help you to identify accessibility issues.
Table of Contents
How To Activate the Accessibility Checker in Excel?
1. Windows

You can activate the Excel accessibility checker in windows in 5 simple steps.
- Open the document that needs an accessibility check
- Go to the File menu and select info.
- Under info, go to the inspect document option
- Next, click on the check issues option and select the check accessibility option in the drop-down menu
- The accessibility report for your file will be generated
2. Mac

Unfortunately in the Mac, the accessibility checker is only available in Microsoft Office 2016 and later versions.
- Open the document that needs an accessibility check
- Select the review tab under the menu.
- Click on the check accessibility option in the review ribbon
- In the menu, select the “Review” tab.
- The accessibility report for your file will be generated
3. Office 365
Follow the similar procedure as explained for the Mac
Overview of Accessibility Checker Report

The Accessibility Checker report is displayed inside the document itself. The report categorizes issues into 3 categories: Errors, Warnings and Tips
1. Errors
These are the issues that require immediate attention as it is very difficult or impossible for people with disabilities to understand them. If you don’t understand these errors, don’t worry Microsoft also provides an explanation for it.
2. Warnings
Warnings highlight the content that is most likely to be hard for people with disabilities to read or understand.
3. Tips
As the name suggests tips are pointers that help you to enhance the accessibility of your document by making required changes.
How to add Alt text for media in Excel?
Alt text or alternative text is conveying the relevant information about an image through texts.
This helps in two ways
● Helps screen readers to convey the meaning of the image
● Even in the case of unstable internet or poor connection, everyone can understand the image’s meaning.
To add alt text to an image in Excel, just right-click an image and select Edit Alt text. Describe the image in one or two sentences in the box and you are good to go.
Also Read: Important Steps For Your Website’s Accessibility Self Audit
Sometimes, we add visuals such as stylish borders, abstract images, etc to make the document look more appealing. In such cases, we can mark these visuals as decorative. Screen readers convey it as a decorative image to its users. They will understand that the image is not important and move forward.
If the document is exported to a PDF file, the visuals marked decorative will be automatically assigned artifact tags within the PDF. Screen readers skip artifact-tagged elements in the PDF file.
Automatic Alt text

Excel can also generate alt-text automatically.
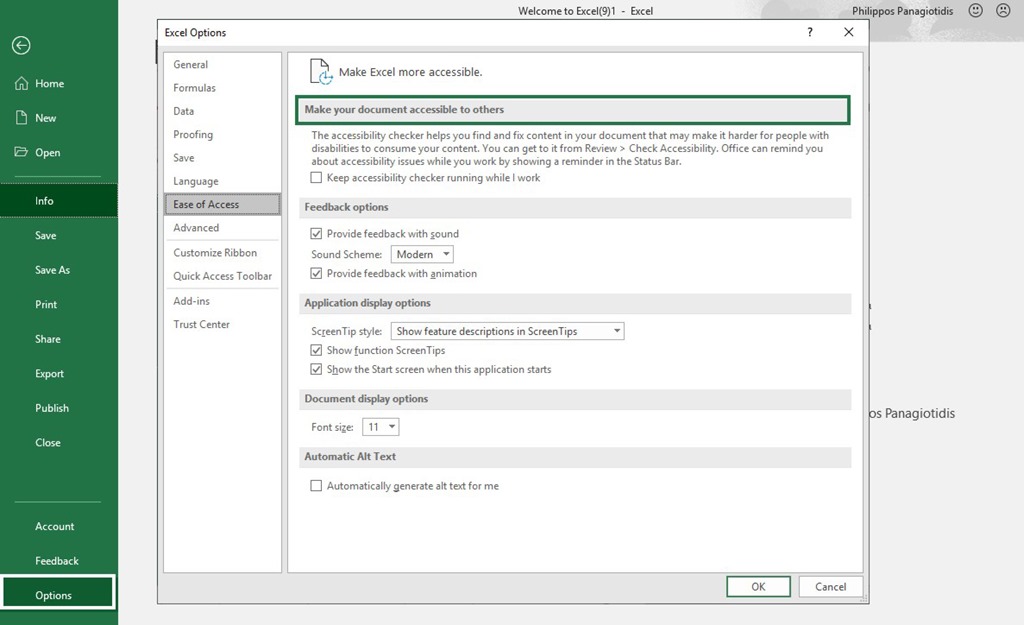
To enable automatic alt text, Select File > Options > Ease of Access.
In the automatic alt text section, select automatically generate alt text for me option and click OK.
If you don’t want Excel to automatically generate alt text for you, just turn it off by following the same process as above. Don’t worry, you can turn it back on whenever you want.
How can I make my Excel more accessible?

Here are some tips to further enhance the accessibility of your document. We have divided it into 3 categories for ease of understanding.
1. Single Cells and Sheets
- Try to avoid merging cells as this becomes confusing for screen reader users to distinguish rows and columns.
- Try to use formatting tools to adjust columns height or width instead of using blank cells for formatting.
- Always have titles before any set of data in spreadsheets.
- Ensure that all rows and columns are labelled properly in a data table
2. Multiple Data Sets
- Try to avoid having multiple data sets in a single spreadsheet. Split the data sets into different spreadsheets. This helps screen reader users to easily navigate to their desired sheet.
- Make sure that you rename the sheets properly. Try to be descriptive so that screen reader users understand the contents of the sheet.
- Every sheet should follow the above-mentioned recommendations for single cells and sheets
- You can also use the names feature to name a range of cells. This helps users to understand the formulas easily. This helps screen readers to read out header names along with cell values.
The names feature also helps in navigation. Users can quickly navigate to any range via the name box
3. Tables, charts and graphs

- Always add alt text to the visuals like images, charts, etc. Mark them decorative if they are not informative.
- Try to use different types of dotted lines to help colour blind users easily understand the content
- Avoid colouring lines with yellow and bright teal and use darker colours instead Avoid using the yellow and bright teal lines; use formatting options to change it to a darker colour.
- Avoid using too many colours for charts and use black and white colours instead.
Hopefully, our blog answers all your questions related to accessibility in Excel. Microsoft has always been a vocal supporter of accessibility for people with disabilities. It aims to provide the best possible experience for its product users. If you need assistance remediating legacy Excel files, our experts can help you.


